Any links to online stores should be assumed to be affiliates. The company or PR agency provides all or most review samples. They have no control over my content, and I provide my honest opinion.
Netgear Arlo Q Review – Indoor Wireless IP CCTV
Netgear released their range of completely wireless weatherproof IP CCTV cameras called the Arlo a couple of years ago. They have been widely praised by critics and users alike, they are easy to set up while providing good results.
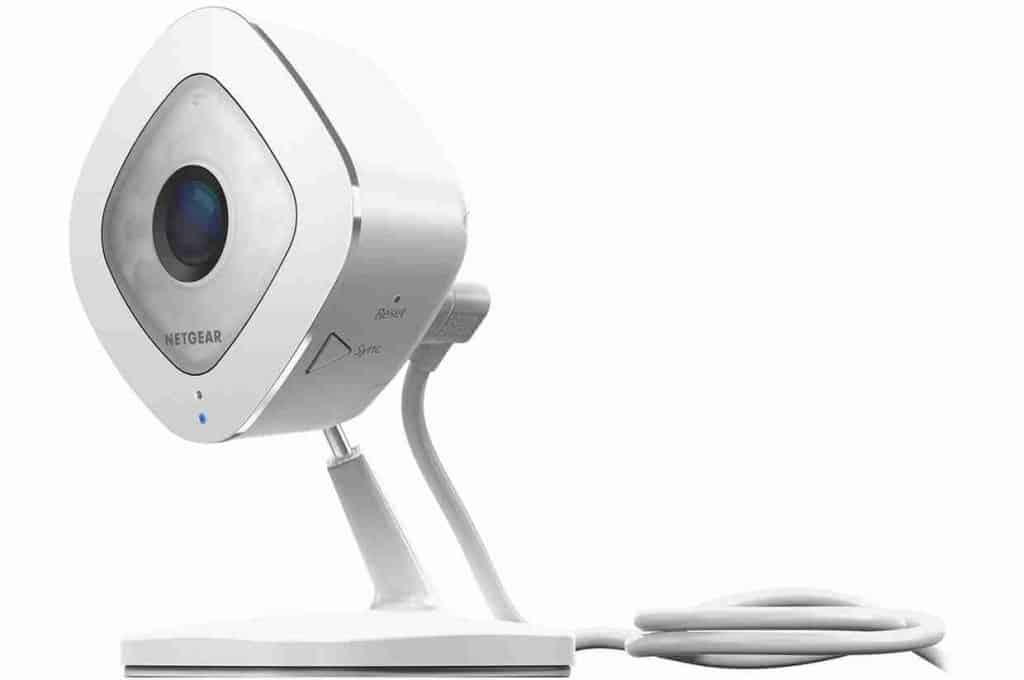
Netgear is hoping to replicate this success with the Arlo Q. This is an indoor IP CCTV that connects to WiFI but is powered by MicroUSB.
They key features of the Arlo Q include:
- 1080p HD video recording at 30fps
- 2-way audio
- Night vision
- Motion and audio detection
- AC powered
- 24/7 cloud recording
Unlike the original Arlo, you do not require a base station, so all you need is the camera. Everything works more or less the same. You rely on an app on your phone, and video recordings triggered by movement are stored for free on Netgear servers for 1 week.
The device itself is both small and attractive. It isn’t small enough that it can be completely hidden but it is certainly small enough not to be obtrusive in whatever environment you put it in.
The stand that comes with it is solid enough that there is no wobble when trying to position it into places, and it is mounted on a ball joint so you can angle the camera as you wish. There is also a mounting plate, so you can have it on a wall or ceiling too.
The camera itself has a 170-degree wide-angle lens and can record up to 1080p resolution at 30fps. Surrounding the camera are 10 infrared LEDs that provide enough light to illuminate up to 25ft away. Below the camera is a status LED which gives you feedback on it being powered and connected.
The included charging cable is 3 metres long, so you have plenty of leeway to find a good spot for your camera.
Network connection is handled by built-in Wi-Fi, with both 2.4GHz and 5GHz bands.
Setting up is very simple, it took me less than 5 minutes, and requires no technical knowledge. You just plug your camera in, download the app, and go through the set-up process. This includes setting up a Netgear account, adding your network settings, hitting the sync button on the camera and scanning a QR code with the camera.
As there is no onboard storage or network storage you are reliant on the cloud storage provided by Netgear. The basic, and free plan includes:
- 7 Days of Cloud Recordings
- (Up to 1GB Cloud storage)
- Up to 5 cameras
- 3 months limited support
Premier is £6.49pcm at includes:
- 30 Days of Cloud Recordings
- (Up to 10GB Cloud storage)
- Up to 10 cameras
- Unlimited Support
Elite is £9.99pcm and includes:
- 60 Days of Cloud Recordings
- (Up to 100GB Cloud storage)
- Up to 15 cameras
- Unlimited Support
You can also have 24/7 recording which starts at £6.99 pcm per camera.
For me personally, I don’t have much use specifically for an indoor camera, I have no children, pets and I work from home. I am paranoid about security and regularly miss the postman. So, I decided to point the camera out of the window to pick up people coming to my front door.
Doing this I had quite a few issues with the camera in its default settings. The main issue was false alerts from both motion and audio. The main problem was cars triggering it as the camera pointed towards my gate.
I quickly worked out how to switch off the audio, and after a little browsing around in the settings I realised you could set up an activity zone, so I was able to select an area where a person would definitely pass, but no moving cars would be visible.
Another minor issue was the status light. This would cause serious glare on my windows and I was beginning to think this was a major design flaw until I realised you can switch it off in the settings.
In fact, you can do a lot of things within the settings, which makes the camera considerably better than other devices I have used in the past. One of the handy features is being able to set up modes for the camera, there are several options including armed, off, schedule and geofence. You can also set up a custom mode.
In my case, I used a schedule with a custom mode. During the day, I have the device armed normally with both push notifications and emails. Then in the evening when I don’t expect visitors and don’t want to be bothered by false alerts I switch to email only.
While I don’t use it myself, the geofence option is a great feature too. It works the same as the schedule, except the different modes activate based on if you are home or away.
By default, the camera is set to 720p, and it works fine like this. I assume this is for bandwidth reasons, but my camera is right next to a 5Ghz router, so I set it to 1080p and noticed a decent improvement in picture quality.
Unfortunately, while the motion detection is good, there can be some lag between notifications. I managed to reduce this to a minimum by cranking up the motion sensitivity, and this seemed to work fine most of the time, but not 100%.
Overall, the Netgear Arlo Q is a great indoor CCTV camera and would make a great addition to a system employing the outdoor wireless cameras too.
It is about the most user-friendly and easy to install system I have come across. It is also relatively cheap too, as you do not need a DVR/NVR to record your video, and no wires mean no setup costs.
All this obviously does come with some drawbacks. No local recording is going to be the biggest issue you are restricted to limited motion detected recording unless you pay a fee. The settings are amazing for this particular system, but dedicated IP CCTV systems will offer more.
This is a perfect solution for your regular home user, though. I’d go as far to say that the cost of entry is low enough that it seems daft for anyone not to implement it for some home security.
I am James, a UK-based tech enthusiast and the Editor and Owner of Mighty Gadget, which I’ve proudly run since 2007. Passionate about all things technology, my expertise spans from computers and networking to mobile, wearables, and smart home devices.
As a fitness fanatic who loves running and cycling, I also have a keen interest in fitness-related technology, and I take every opportunity to cover this niche on my blog. My diverse interests allow me to bring a unique perspective to tech blogging, merging lifestyle, fitness, and the latest tech trends.
In my academic pursuits, I earned a BSc in Information Systems Design from UCLAN, before advancing my learning with a Master’s Degree in Computing. This advanced study also included Cisco CCNA accreditation, further demonstrating my commitment to understanding and staying ahead of the technology curve.
I’m proud to share that Vuelio has consistently ranked Mighty Gadget as one of the top technology blogs in the UK. With my dedication to technology and drive to share my insights, I aim to continue providing my readers with engaging and informative content.


