Any links to online stores should be assumed to be affiliates. The company or PR agency provides all or most review samples. They have no control over my content, and I provide my honest opinion.
KVM-over-IP (Keyboard, Video, Mouse over Internet Protocol) systems provide remote access to computers at the hardware level, allowing users to control machines regardless of their operating system state. Unlike software-based remote access solutions such as Remote Desktop Protocol (RDP) or VNC, KVM-over-IP works even when a computer is in the BIOS, has crashed, or doesn’t have an operating system installed.
The Geekworm KVM-A3 kit offers an affordable DIY approach to building a KVM-over-IP solution based on the Raspberry Pi 4. It uses the open-source PiKVM software, which has gained popularity among system administrators and tech enthusiasts for its robust features and reliability.
While commercial KVM-over-IP solutions can cost hundreds or even thousands of pounds, the Geekworm KVM-A3 provides similar functionality at a fraction of the price, making it an attractive option for home labs, small businesses, and IT professionals who need remote management capabilities without the enterprise price tag.
Geekworm IP KVM Models
Geekworm offers several KVM solutions in their product lineup, each designed for different use cases and hardware configurations. The KVM-A3 is part of a broader family of PiKVM products from Geekworm.
The company’s KVM family includes:
- KVM-A3 V1.6: Compatible with Raspberry Pi 4, HAT form factor, supports 1920×1080 @50Hz, includes ATX control, RTC chipset (DS1307), 0.96″ OLED display, and 1GbE Ethernet.
- KVM-A8 V1.8: Similar to the KVM-A3 but in PCI form factor, includes 802.3af PoE support.
- KVM-A4 V2.0: Designed for Raspberry Pi 2W, HAT form factor, supports 1920×1080 @50Hz.
- X680 V1.5: Compatible with Raspberry Pi CM4, box form factor, supports 1920×1080 @60Hz, includes ATX control, can manage up to 4 PCs, and features a 2280 M.2 NVMe socket.
- X650 V1.3: Compatible with Raspberry Pi CM4, PCI form factor, supports 1920×1080 @50Hz.
- X652 V1.0: Compatible with Raspberry Pi CM4, PCI form factor, supports 1920×1080 @60Hz, includes 802.3af PoE support and a 2280 M.2 NVMe socket.
The KVM-A3 reviewed here is positioned as an entry-level option for those looking to build a single-computer KVM-over-IP solution using a Raspberry Pi 4.
Specification
The Geekworm KVM-A3 sits within a broader ecosystem of PiKVM solutions, with varying features and capabilities. Here’s how it compares to other PiKVM models:
| Feature | V4 Plus | V4 Mini | V3 | DIY V2 (KVM-A3) |
|---|---|---|---|---|
| Plug and Play out of box | Yes | Yes | Yes | DIY |
| Base Raspberry unit | CM4 Included | CM4 Included | RPi4 Included | RPi4 / Zero2W |
| Video passthrough to local display | Yes | No | No | No |
| HDMI 1920×1200@60Hz support | Yes | Yes | Yes | No |
| HDMI 1920×1080@60Hz support | Yes | Yes | Yes | No |
| HDMI audio capture | Yes | Yes | Yes | No |
| Microphone emulation | Yes | Yes | Yes | No |
| Super fast H.264 & MJPEG video | Yes | Yes | Yes | No |
| USB keyboard/mouse emulation | Yes | Yes | Yes | Yes |
| Virtual Flash Drive / CD/DVD emulation | Yes | Yes | Yes | Yes |
| Ability to simulate ‘eject/insert’ for USB | Yes | Yes | Yes | Yes |
| Onboard ATX controller | Yes | Yes | Yes | DIY |
| Built-in OLED | Yes | No | No | No |
| Multiport KVM switches support | Yes | No | No | No |
| Internal secured USB 3.0 storage port | Yes | No | No | No |
| USB serial console port | Yes | Yes | Yes | Yes |
| CISCO-style RJ-45 console port | Yes | No | No | No |
| Real-time clock | Yes | Yes | Yes | Yes |
| Locator LED | Yes | No | No | No |
| mPCIe slot with USB lines | Yes | No | No | No |
| SIM card slot | Yes | No | No | No |
| External antenna support | Yes | No | No | No |
| USB host support | Yes | No | No | No |
| Cooling system / fan type | Quiet Radial | Fanless | Axial | DIY |
| PWM fan controller | Yes | No | No | No |
| Fan speed and health monitoring | Yes | No | No | No |
| Power consumption in idle mode | 3.3W | 2.65W | 3.3W | – |
| USB relays, lamps, smartplugs control | Yes | No | No | No |
| Pi’s GPIO ports control from the Web UI | No | No | No | No |
It’s worth noting that while the KVM-A3 (DIY V2) lacks some of the advanced features of the more expensive models, it provides the core functionality needed for a KVM-over-IP solution at a much lower price point.
Features
The Geekworm KVM-A3 kit includes several key features that make it a capable KVM-over-IP solution:
- Raspberry Pi 4 Compatibility: Designed for use with Raspberry Pi 4 Model B (1GB/2GB/4GB/8GB versions)
- PiKVM OS Compatibility: Fully compatible with PiKVM V3 OS (not compatible with V4)
- Web-Based Remote Control: Control servers and computers through a standard web browser
- HDMI Capture: Full HD capture based on the TC358743 chip, supporting resolutions up to 1920×1080 at 23Hz
- OTG Keyboard & Mouse Emulation: Allows remote keyboard and mouse control of the target computer
- Mass Storage Drive Emulation: Can present virtual storage devices to the target computer
- Hardware Real-Time Clock (RTC): Includes a CR1220 coin battery socket for maintaining accurate time
- GPIO Protection: Equipped with solid-state relays to protect Raspberry Pi GPIO pins from computer and ESD spikes
- ATX Control: Via RJ45 connector, allows remote power on/off, reset, and monitoring of HDD LED & power LED status
- Future Expansion: Reserves connectors for potential I2S HDMI audio support and includes mounting for an I2C OLED display
- Active Cooling: Includes a fan for keeping the Raspberry Pi cool during operation
The KVM-A3 kit provides the essential hardware needed to transform a Raspberry Pi 4 into a functional KVM-over-IP device, though it does require the user to supply their own Raspberry Pi, power supply, and microSD card.
PIKVM OS Features
The Geekworm KVM-A3 uses the PiKVM OS, which is based on Arch Linux ARM. This open-source platform offers several advantages over proprietary solutions, including customisability and a rich feature set.
Read-only Filesystem
By default, PiKVM OS operates in read-only mode, which helps protect the microSD card from corruption due to sudden power loss or improper shutdowns. When configuration changes are needed, the filesystem can be temporarily remounted as read-write.
Remote Access and Management
- VNC Server: The OS includes a VNC server, allowing remote access to the managed server and its BIOS using any standard VNC client that supports JPEG compression.
- Web UI: In addition to VNC, PiKVM offers a lightweight web interface for management tasks, providing access without the need for proprietary software.
Server Management Protocols
- IPMI BMC and Redfish: PiKVM supports both the legacy IPMI protocol and the more modern Redfish API for out-of-band server management. This enables power control, monitoring, and serial-over-LAN access using standard tools.
- Wake-on-LAN: The OS can be configured to send Wake-on-LAN packets, allowing remote power-up of connected servers via the web menu or configuration files.
Extensible Authentication
PiKVM supports multiple authentication methods and can be integrated with central authorisation services. It leverages Linux PAM for compatibility with various authentication backends, allowing integration into existing authentication infrastructures.
Macro Scripting
For automating repetitive tasks, PiKVM allows users to record and replay macros consisting of keyboard and mouse actions. This is particularly useful for managing multiple servers or performing routine maintenance.
Customisation and Build Environment
The OS is designed to be production-ready but also highly customisable. Users can build their own images using a dedicated build environment, specifying the target Raspberry Pi model and hardware configuration.
Security Considerations
- Read-only mode helps mitigate filesystem corruption
- HTTPS is supported out of the box for secure remote access
- IPMI is supported but not recommended for use outside trusted networks due to security concerns; Redfish is preferred for modern deployments
Summary Table: Core Features
| Feature | Description |
|---|---|
| Base OS | Arch Linux ARM, customisable, package-rich |
| Filesystem | Default read-only mode for reliability |
| Remote Access | Web UI, VNC server |
| Server Management | IPMI BMC, Redfish, Wake-on-LAN |
| Authentication | PAM support, central auth integration |
| Macro Scripting | Record/playback keyboard & mouse macros |
| Update Mechanism | Single-command package upgrades |
| Security | HTTPS, read-only FS, PAM, warnings on insecure protocols |
The PiKVM OS provides a robust foundation for the KVM-A3 hardware, offering features typically found in much more expensive commercial KVM-over-IP solutions.
Unboxing / Assembly
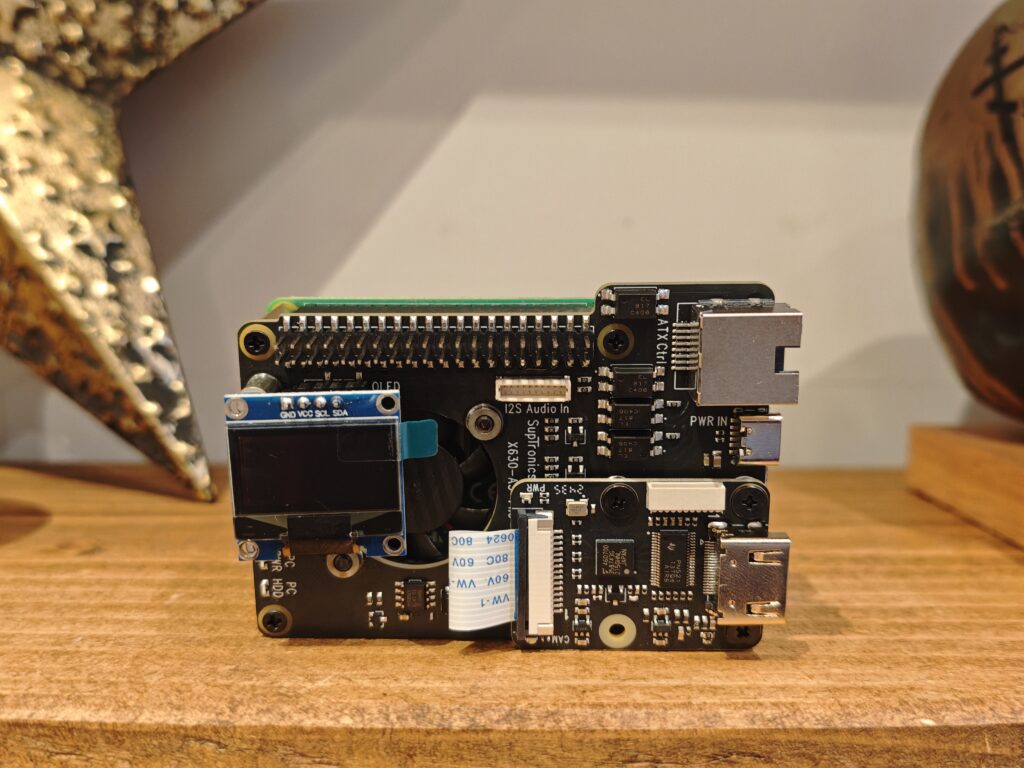
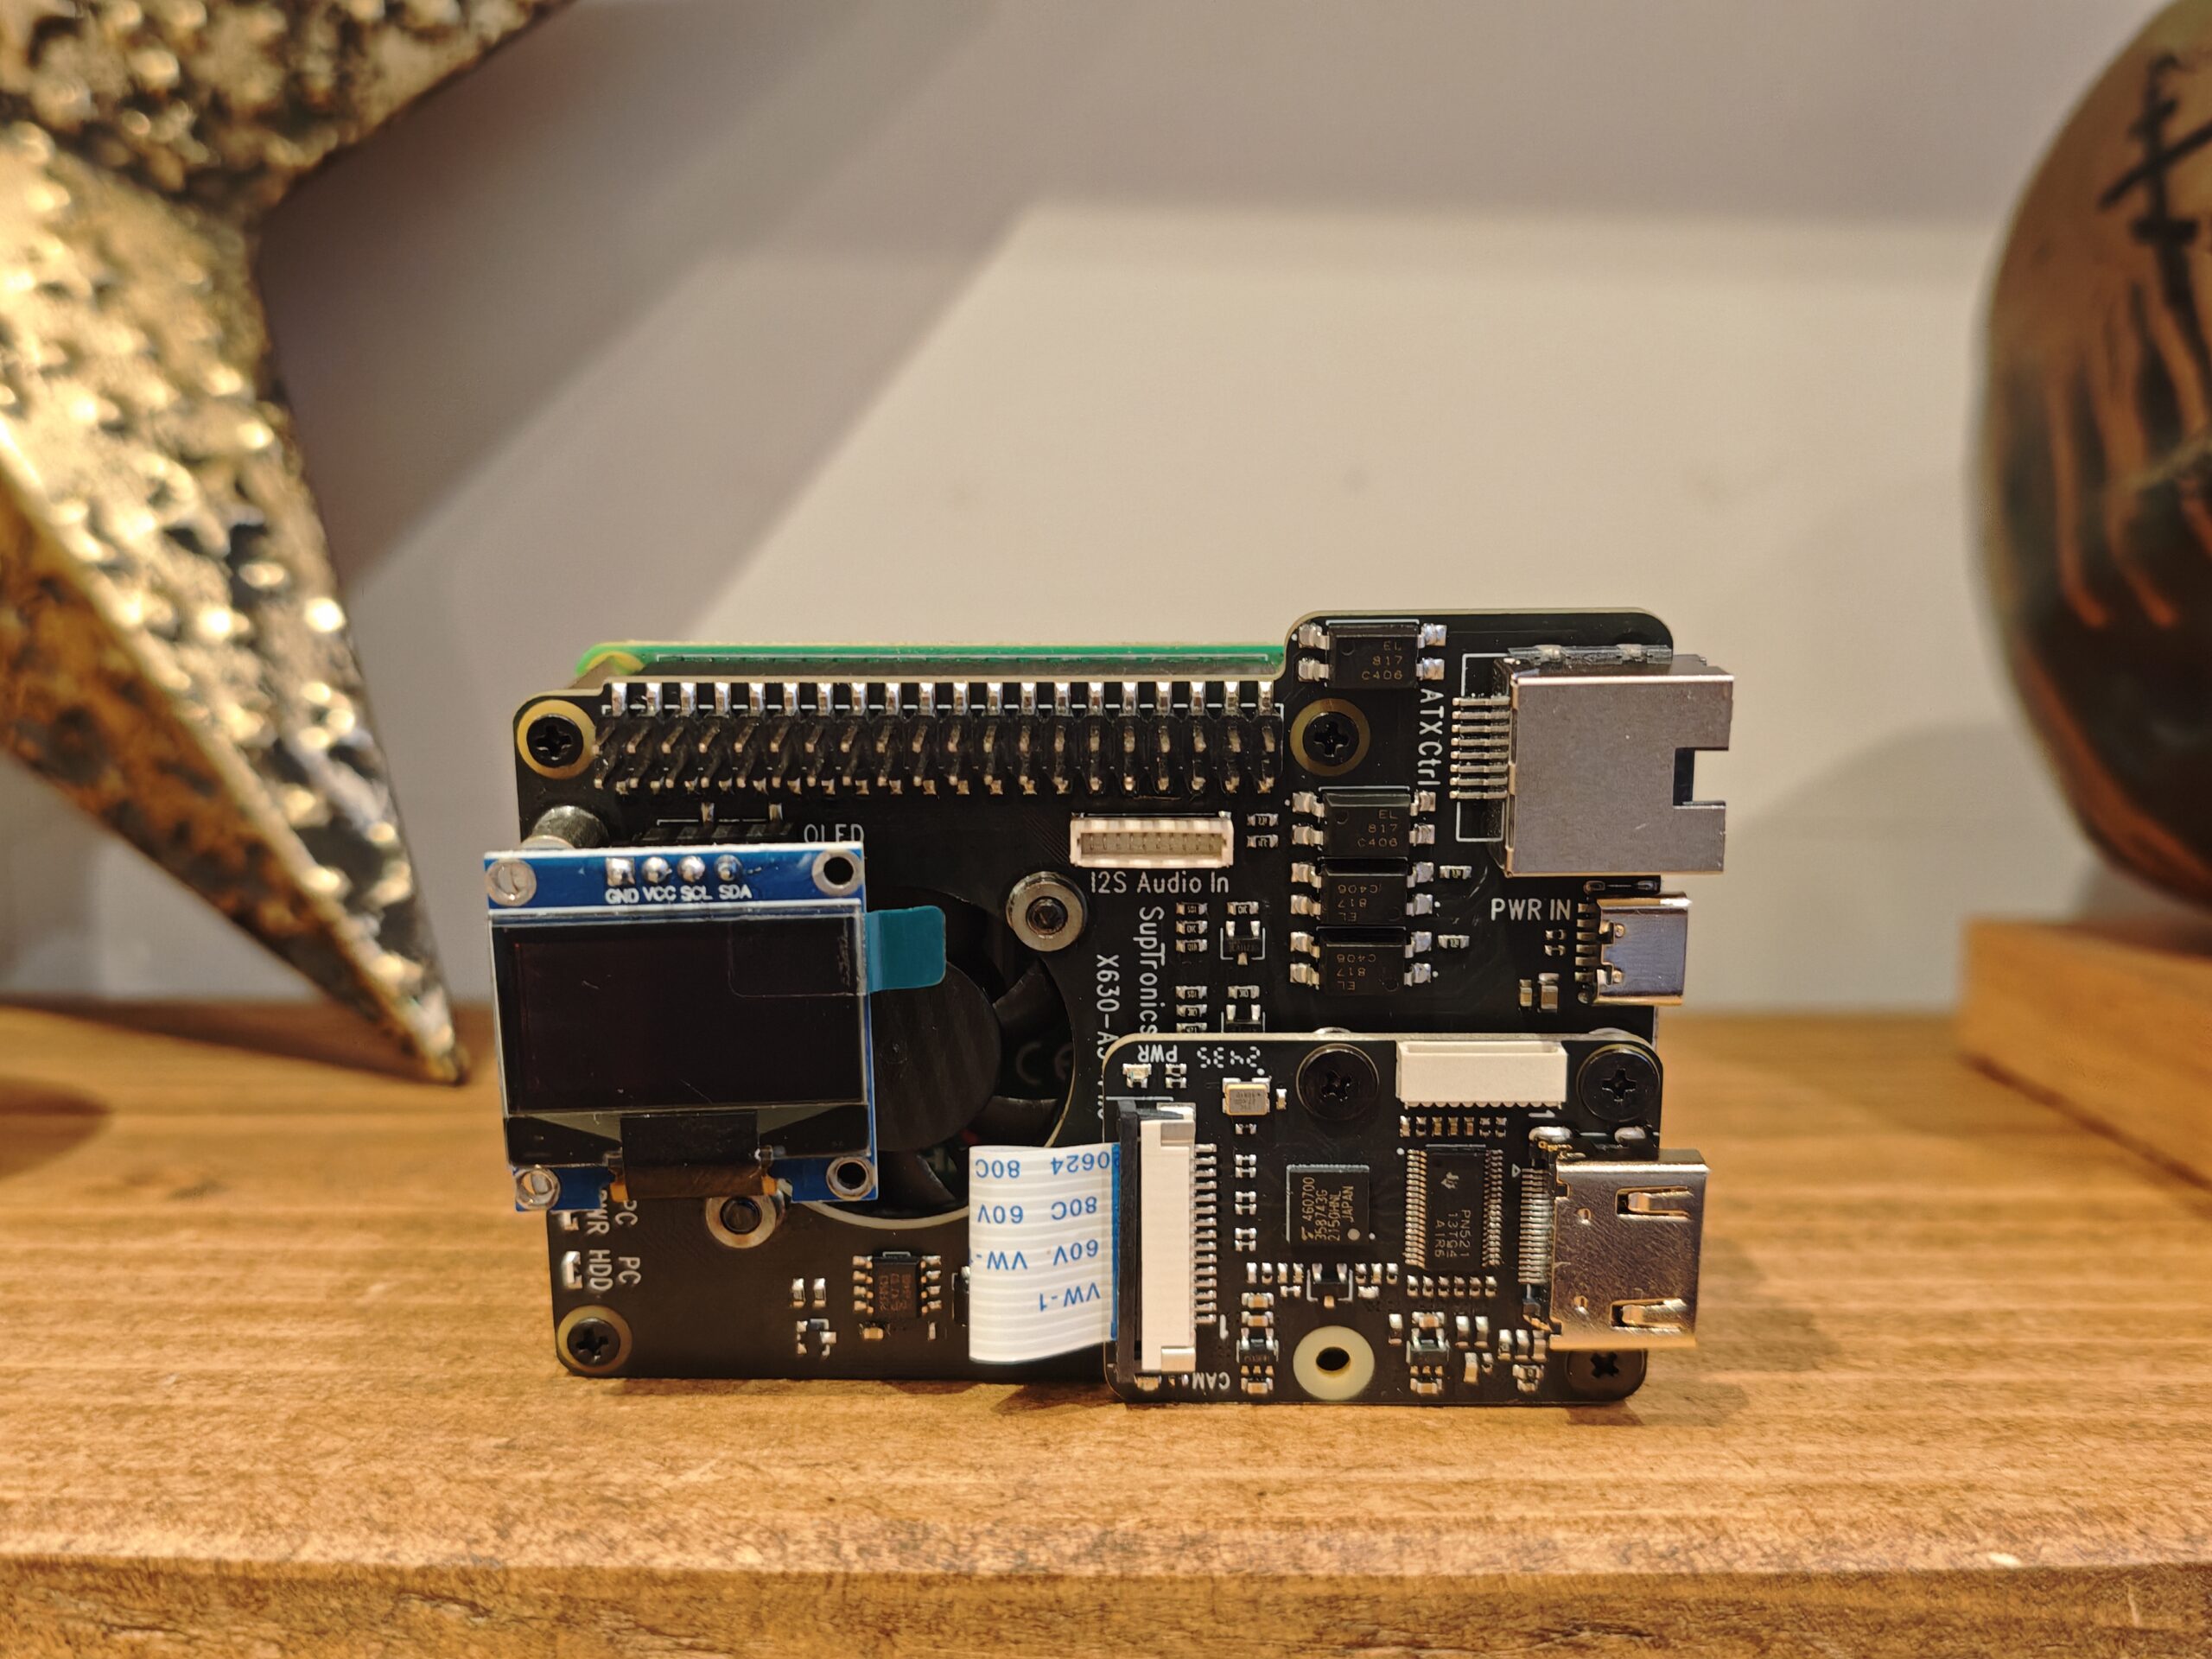
The Geekworm KVM-A3 kit comes neatly packaged with all components organised in a single box. Upon opening, you’ll find:
- X630-A3 Expansion Board (V1.2/V1.3/V1.6)
- X630 HDMI to CSI-2 Module
- 0.96-inch OLED display (128×64 pixel resolution)
- X630-A5 V1.0 Adapter Board
- ATX Control Ethernet Cable (100cm length)
- USB-A to USB-C OTG Cable (100cm length)
- FFC Cable (5cm length)
- Various screws, spacers, and mounting hardware
- ATX Control Cable (47cm length)
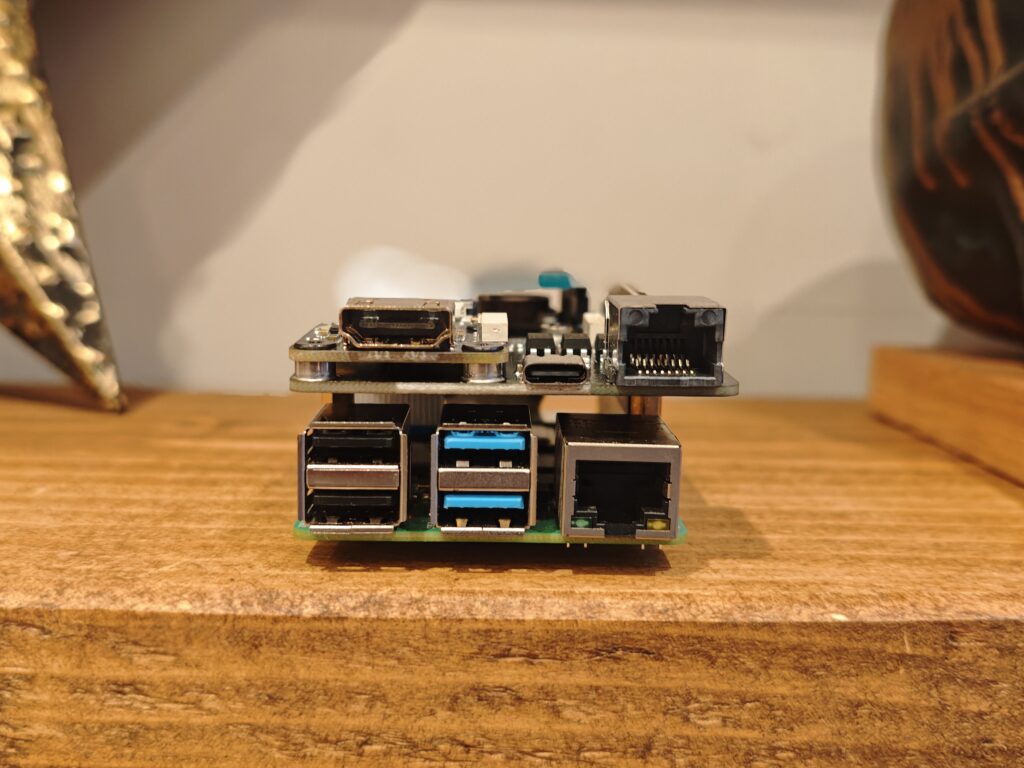
What’s notably absent is the Raspberry Pi 4 itself, which must be purchased separately. You’ll also need to supply your own power supply (5.1V DC, ≥3A via USB Type-C), microSD card (32GB minimum, Class 10 recommended), and HDMI cable.
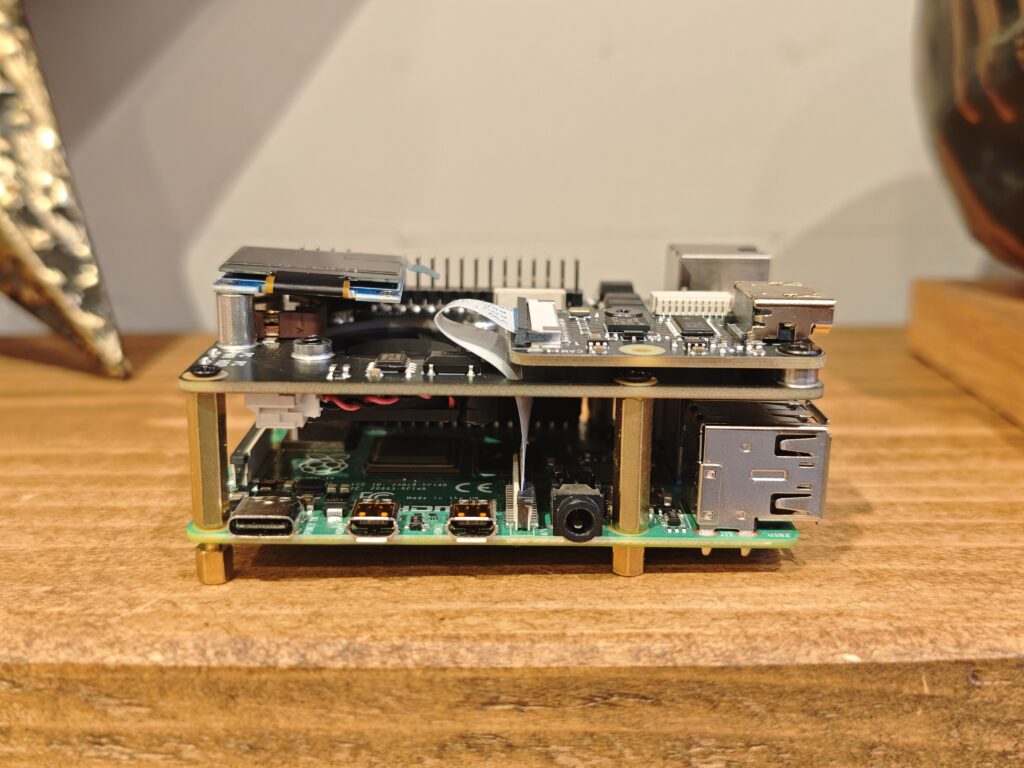
The assembly process is straightforward but requires attention to detail due to the small components involved. Geekworm provides both a printed manual and a YouTube video guide for assembly, though the video is slightly outdated due to design changes in newer versions of the kit.
Some key points to note during assembly:
- Begin by connecting the FFC cable to the Raspberry Pi’s camera connector before mounting the expansion hat. This is easier than trying to connect it after assembly.
- The design has changed since the instructional video was made. The current version has four spacers on the hat board rather than three, and the 10mm screw mentioned in the video has been replaced with an additional 5mm screw.
- When connecting the OLED display, be sure to remove the protective film first. The connector underneath may be at a slight angle, making it challenging to align properly.
- A magnetised screwdriver is highly recommended for handling the small screws.
- For powering the assembled unit, use the USB-C port on the X630-A3 expansion board, not the one on the Raspberry Pi itself (which is used for OTG functionality).
The assembly process takes approximately 30-45 minutes, depending on your experience with similar DIY electronics projects. While not overly complex, it does require careful handling of small components and attention to the correct orientation of cables and boards.
Installation / Set Up
Once the hardware assembly is complete, the next step is to prepare the software. The PiKVM project provides ready-made OS images that can be flashed to a microSD card.
Software Preparation:
- Download the appropriate PiKVM OS image from the official PiKVM website. For the KVM-A3 kit with OLED display and fan, you’ll want the image that specifically mentions “OLED and fan pre-activated.”
- Use an imaging tool like Raspberry Pi Imager, Etcher, or dd (on Linux) to write the image to your microSD card. This process can take 20-30 minutes depending on your computer and the speed of your microSD card.
- Insert the microSD card into the Raspberry Pi, connect an Ethernet cable to the standard Ethernet port (not the ATX port), and power on the device using the USB-C port on the expansion board.
- The PiKVM will boot up and obtain an IP address via DHCP. You can see this IP address on the OLED display as it cycles through system information.
Initial Configuration:
- Open a web browser and navigate to the IP address displayed on the OLED screen. You’ll be presented with a login page.
- Log in with the default credentials (username: admin, password: admin).
- You’ll be presented with three options: KVM (for connecting to the target computer), Terminal (for accessing the PiKVM’s command line), and Logout.
- Before connecting to a target computer, it’s recommended to change the default password and configure any additional security settings.
Connecting to a Target Computer:
- Power off both the PiKVM and the target computer.
- Connect the HDMI cable from the target computer to the HDMI input on the KVM-A3.
- Connect the USB-A to USB-C OTG cable from a USB port on the target computer to the USB-C OTG port on the Raspberry Pi.
- If you’re using the ATX control feature, connect the ATX control cable between the adapter board (installed in the target computer) and the RJ45 ATX port on the KVM-A3.
- Power on the PiKVM and then the target computer.
- In the web interface, select “KVM” to start a remote session.
The setup process is relatively straightforward, though it does require some basic networking knowledge to troubleshoot any connectivity issues. Once configured, the PiKVM operates as a headless device that can be accessed from any computer on the same network (or from the internet, if properly secured and port-forwarded).
User Interface
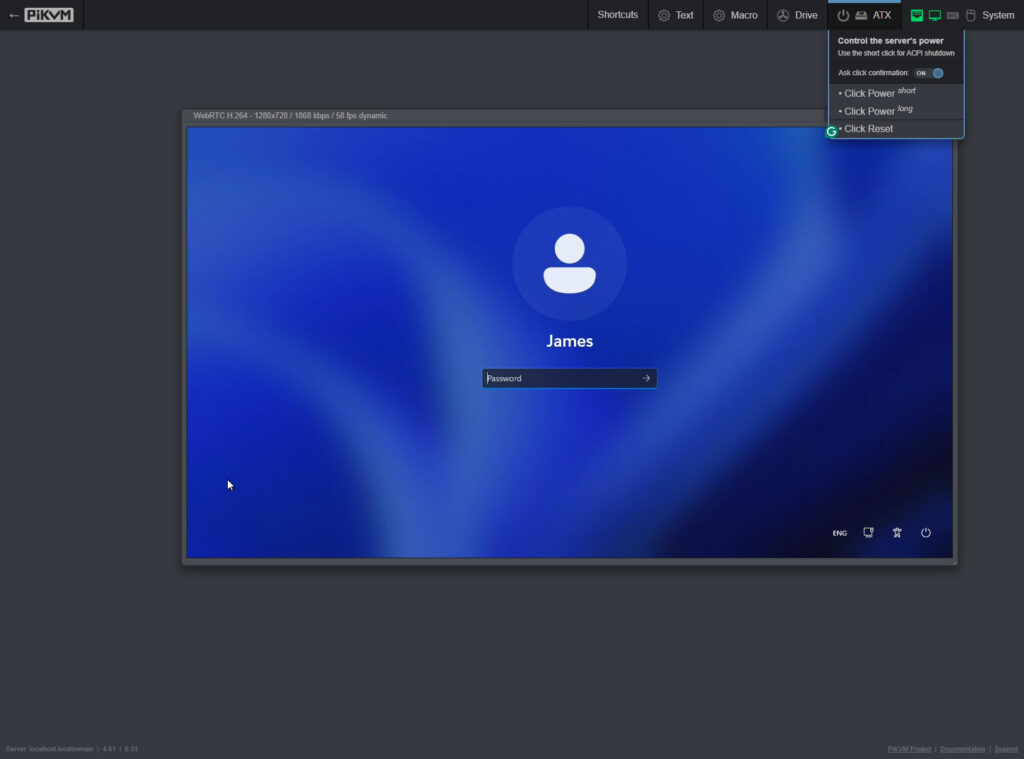
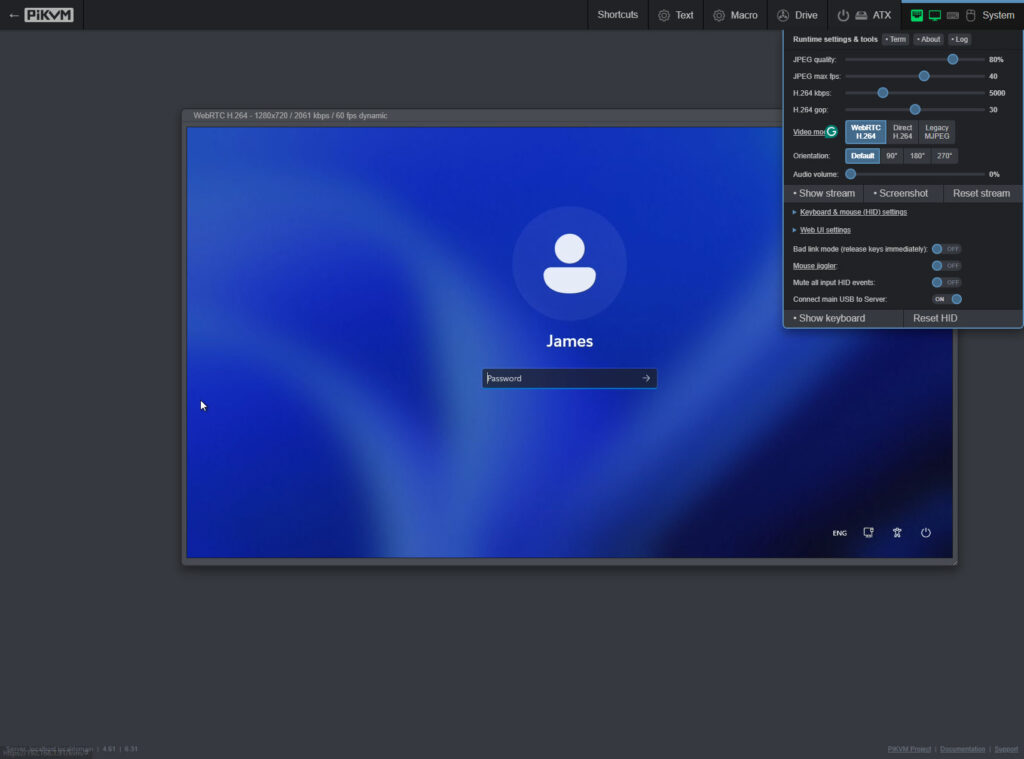
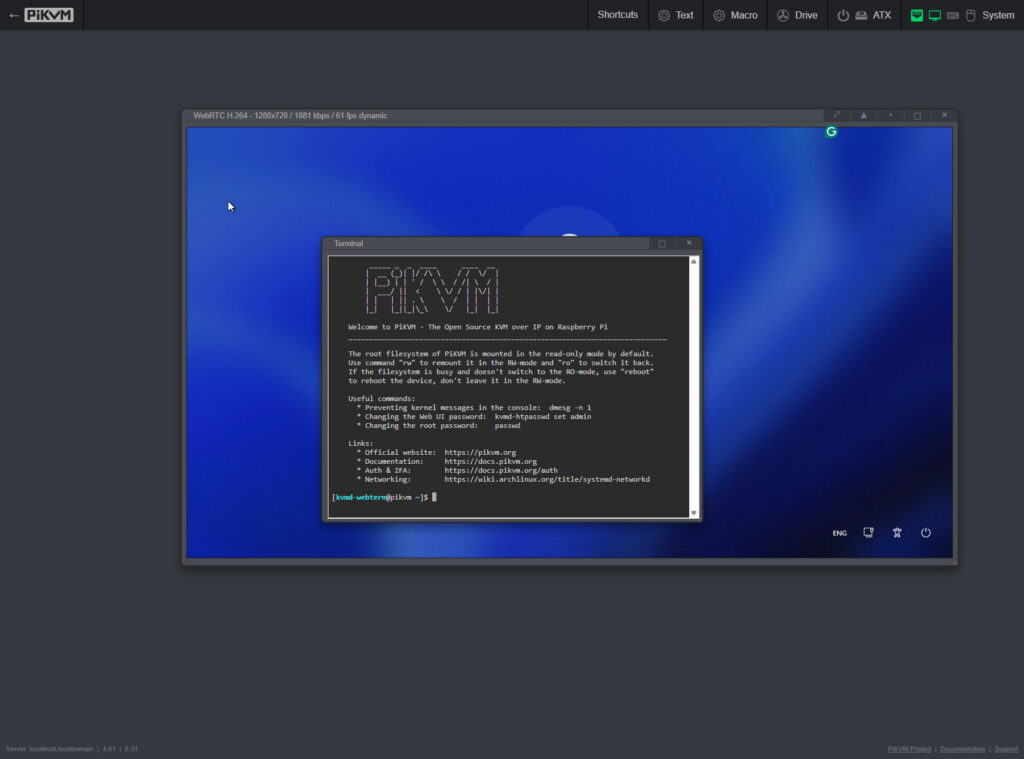
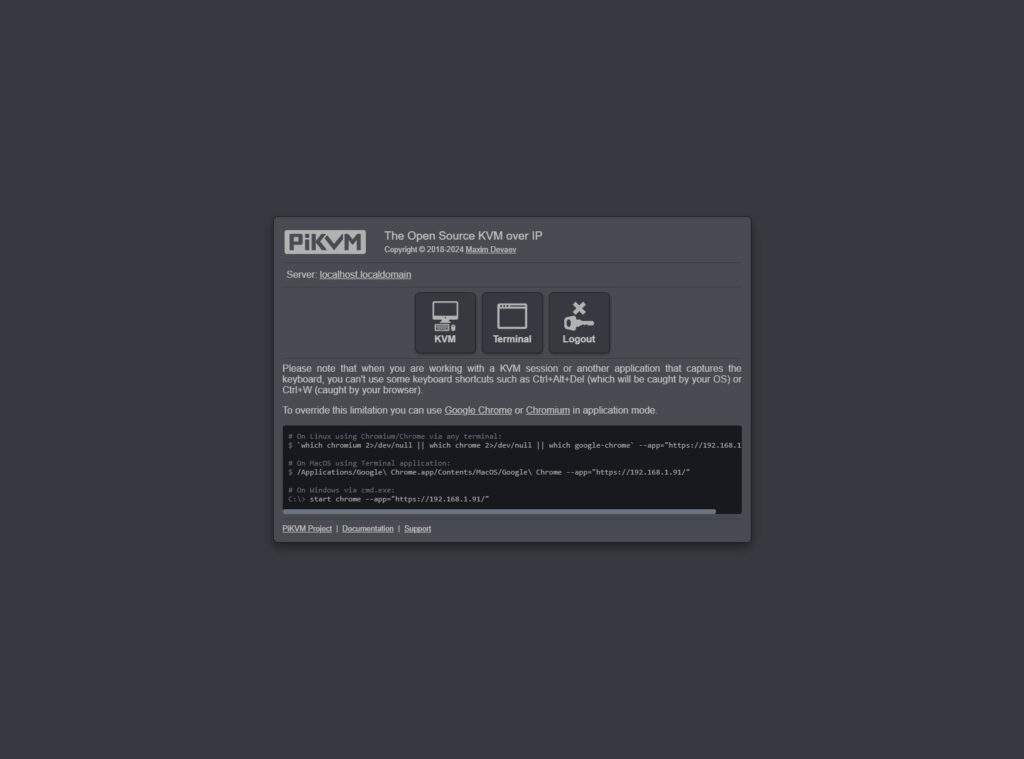
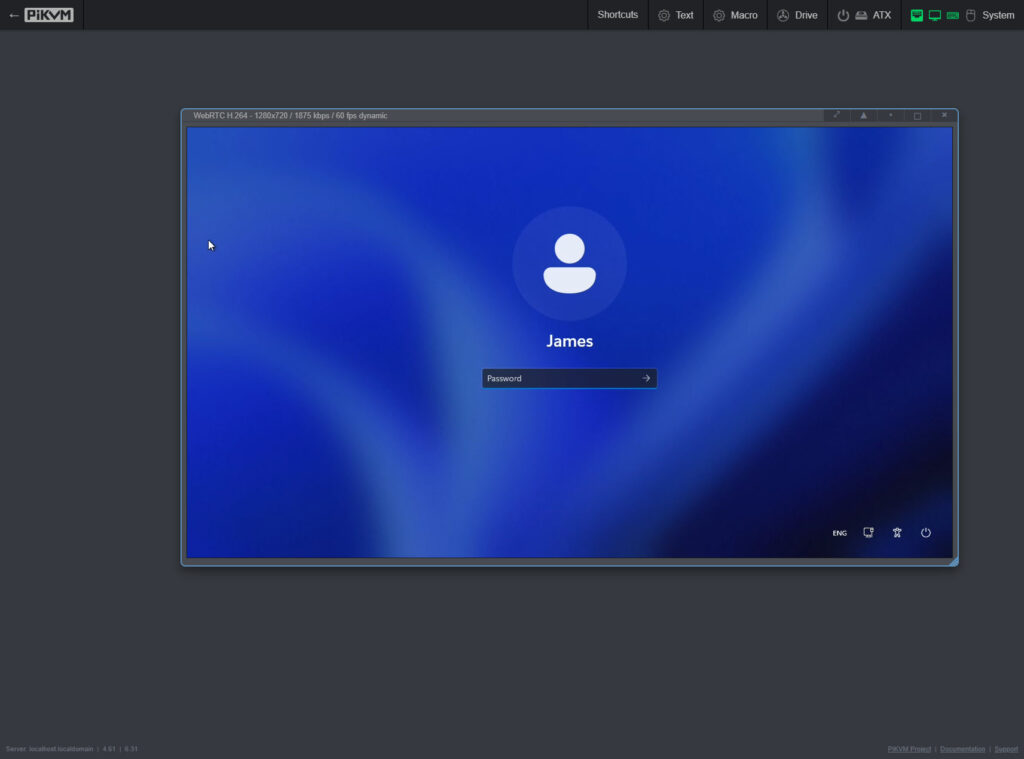
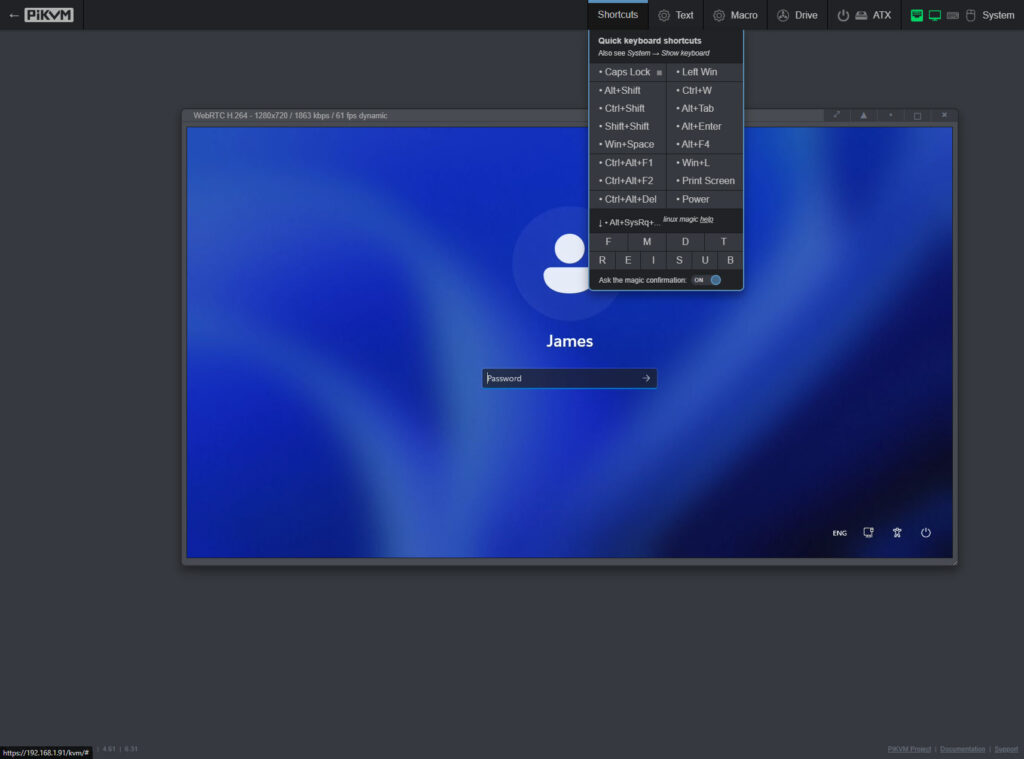
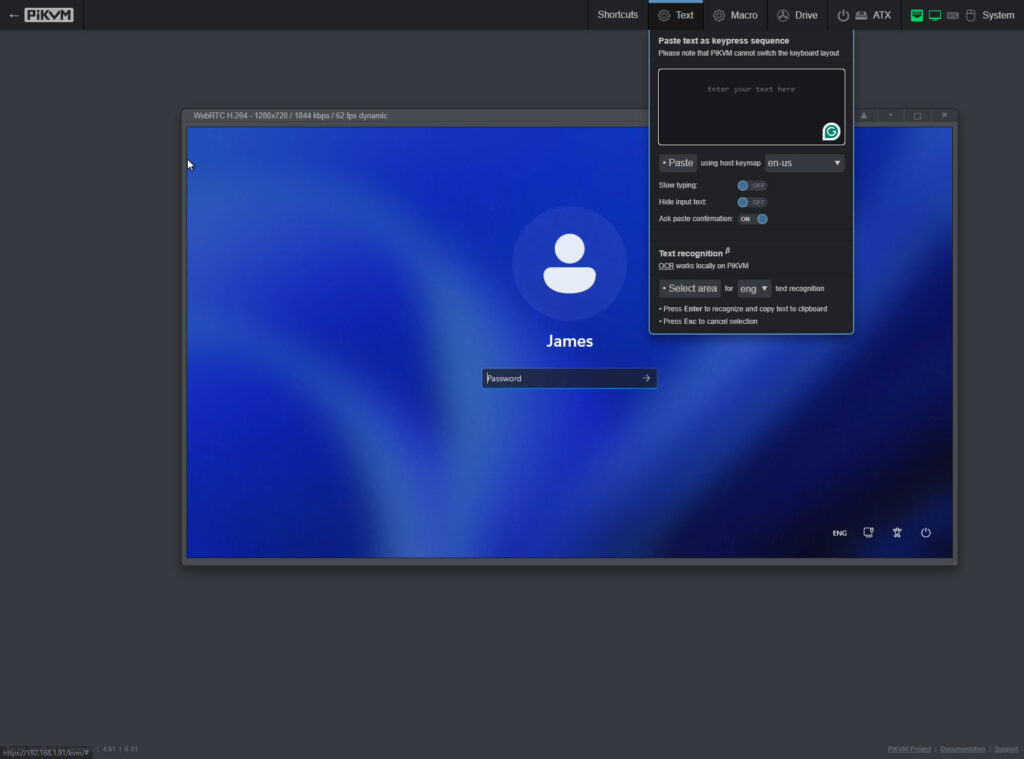
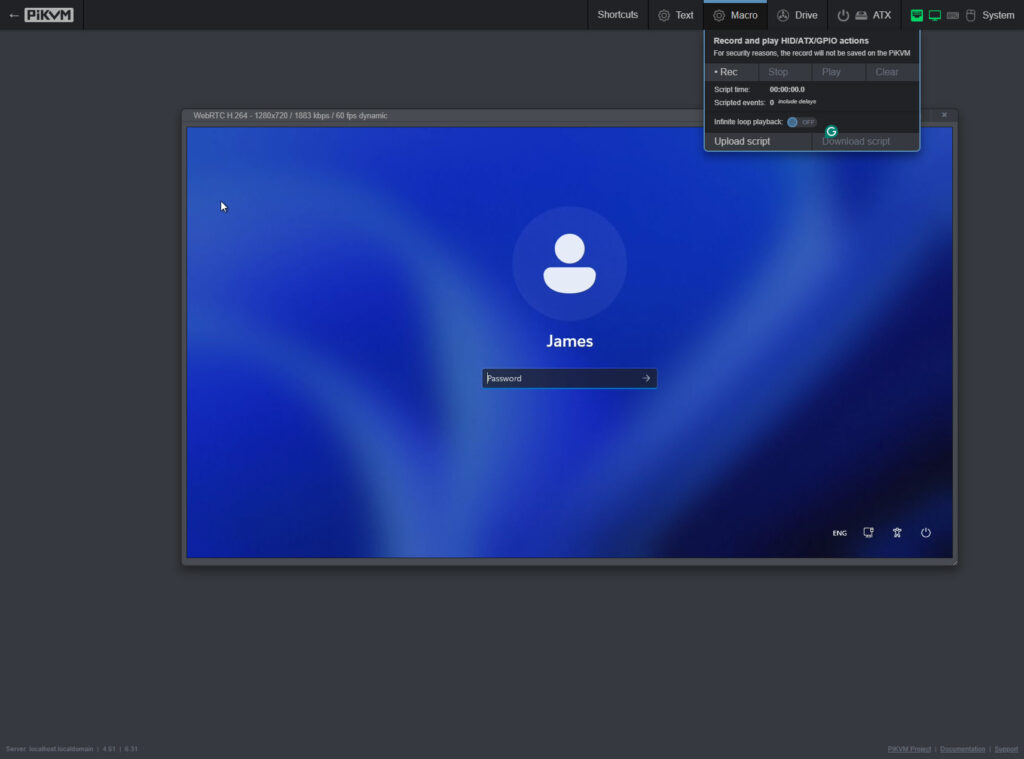
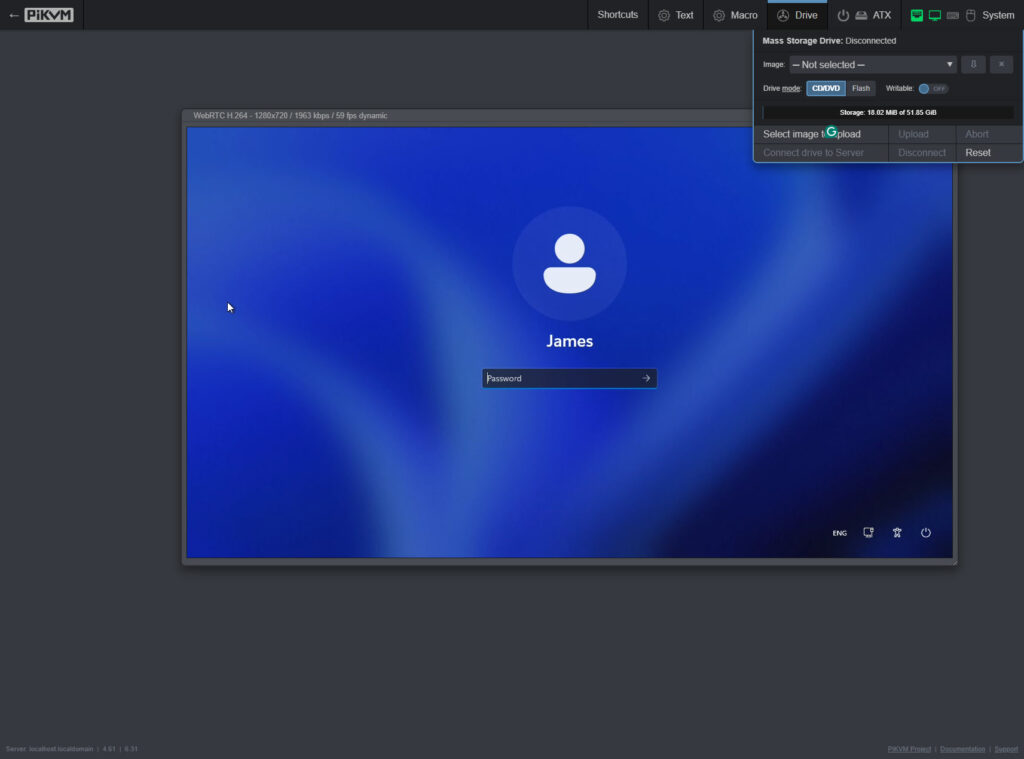
The PiKVM web interface is clean, functional, and focused on providing the necessary controls without unnecessary complexity. Upon logging in, you’re presented with a simple menu offering KVM, Terminal, or Logout options.
KVM Session Interface:
When you select “KVM,” you’re taken to the main remote control interface, which includes:
- A display area showing the video output from the target computer
- Status indicators for power, hard drive activity, and network connectivity
- Power control buttons (power on/off, reset)
- Menu options for additional features
The top of the interface displays technical information about the current session, including the video resolution, refresh rate, and current frame rate. By default, the KVM-A3 supports resolutions up to 1920×1080 at 23Hz, which is sufficient for most administrative tasks but may feel slightly laggy for fast-moving content.
Additional Controls:
The interface includes several useful features accessible from the menu:
- Keyboard: Allows sending special key combinations or using an on-screen keyboard
- Clipboard: Facilitates text copying between the local and remote systems
- Drive: Enables uploading and mounting ISO images as virtual CD-ROM or USB flash drives
- Display: Controls for adjusting the display settings, including resolution
- ATX Power: Options for controlling the power state of the target computer
- System: Access to PiKVM system settings and information
Terminal Interface:
The Terminal option provides command-line access to the PiKVM itself, allowing for advanced configuration and troubleshooting. This interface is particularly useful for users familiar with Linux who want to customise the PiKVM beyond what’s available in the web UI.
User Experience:
The web interface works well in most modern browsers and is responsive even on slower connections. Mouse movement shows some latency with a trailing cursor effect, which is normal for KVM-over-IP solutions and doesn’t significantly impact usability for most administrative tasks.
The keyboard and mouse emulation is reliable, with keystrokes and mouse movements accurately transmitted to the target computer. The interface also handles special key combinations well, which is essential for BIOS access and system recovery scenarios.
Overall, the user interface strikes a good balance between functionality and simplicity, providing the necessary tools for remote management without overwhelming the user with options.
In Use
The Geekworm KVM-A3 performs admirably in real-world use, providing reliable remote access to computers at various stages of operation, from BIOS to desktop environments.
Video Performance:
The video capture capabilities of the KVM-A3 are limited to 1920×1080 at 23Hz, which is lower than the 60Hz refresh rate supported by the official PiKVM v3. This limitation is due to the specific hardware used in the Geekworm kit. In practice, this means:
- Text and static content are clear and readable
- Mouse movements show noticeable latency with a trailing cursor
- Fast-moving content may appear choppy
- The frame rate typically hovers around 24 frames per second
Despite these limitations, the video quality is sufficient for system administration tasks, BIOS configuration, and general troubleshooting. For users who need to stream video games or other high-motion content, the KVM-A3 allows creating custom resolutions in Windows that applications can use, even if the KVM itself can’t display them at full refresh rates.
Keyboard and Mouse Emulation:
The USB OTG connection provides reliable keyboard and mouse emulation, allowing full control of the target computer. Key presses are transmitted with minimal delay, and complex key combinations (such as Ctrl+Alt+Delete) can be sent using the on-screen keyboard menu.
Mouse control works well for general navigation, though the latency means precise operations may require some patience. The system accurately tracks relative mouse movements, making it suitable for most administrative tasks.
Mass Storage Emulation:
One of the most useful features of the PiKVM is its ability to present virtual storage devices to the target computer. This allows:
- Uploading ISO images to install operating systems remotely
- Transferring files to computers without network access
- Booting into recovery tools without physical media
The process is straightforward: upload an ISO image through the web interface, select whether to present it as a CD-ROM or USB flash drive, and connect it to the target computer. The target sees it as a standard storage device, allowing for OS installation, file transfers, or running portable applications.
ATX Power Control:
The ATX control feature allows remote power management of the target computer, including:
- Powering on/off the computer
- Performing hard resets
- Monitoring power and hard drive activity status
This feature requires installing the adapter board in the target computer and connecting it to the motherboard’s front panel headers. While useful for managing a single computer, users wanting to control multiple systems may prefer using Wake-on-LAN and smart power plugs instead, as the KVM-A3 can only control one computer directly.
Network Performance:
The PiKVM operates well over local networks, with minimal latency beyond what’s inherent to the video capture system. Remote access over the internet is possible with appropriate port forwarding and security measures, though performance will depend on available bandwidth.
Practical Applications:
The KVM-A3 excels in several use cases:
- Remote BIOS configuration
- Operating system installation
- Troubleshooting boot issues
- Accessing systems when normal remote desktop solutions fail
- Managing headless servers without dedicated management interfaces
It’s important to note that while the KVM-A3 provides hardware-level access, it’s not intended to replace protocol-specific remote access tools like RDP for Windows or SSH for Linux during normal operation. Instead, it serves as a fallback option for situations where those tools aren’t available or sufficient.
Price and Alternative Options
The Geekworm KVM-A3 kit is available on Amazon for approximately £80. To complete the build, you’ll need:
- Raspberry Pi 4 (1GB model is sufficient): ~£35
- MicroSD card (32GB, Class 10): ~£6
- Power supply (5.1V, ≥3A with USB-C connector): ~£8
This brings the total cost to around £129, making it significantly more affordable than pre-built commercial KVM-over-IP solutions.
Alternative Options:
- Official PiKVM Hardware:
- PiKVM V4 Mini: ~£240
- PiKVM V4 Plus: ~£365
These official options come pre-assembled with a Raspberry Pi included and offer higher refresh rates and additional features, but at a much higher price point.
- Sipeed NanoKVM:
- NanoKVM: ~£60 (including VAT and shipping from AliExpress)
- NanoKVM Mini: ~£35 (including VAT and shipping from AliExpress)
These are even more affordable options but offer fewer features and less flexibility than the PiKVM-based solutions.
- TinyPilot:
- TinyPilot Hobbyist: ~$169 (approximately £130)
- TinyPilot Pro: ~$349 (approximately £270)
TinyPilot is another Raspberry Pi-based KVM-over-IP solution with a focus on ease of use and a polished interface.
- Commercial KVM-over-IP Solutions:
- Lantronix Spider: ~£400-£600
- Raritan Dominion KX III: ~£800-£1,500
- APC KVM-over-IP: ~£500-£1,000
These enterprise-grade solutions offer higher performance and additional features but at significantly higher prices.
Overall
The Geekworm KVM-A3 kit offers an impressive balance of functionality, affordability, and flexibility. As a DIY solution based on the Raspberry Pi 4 and open-source PiKVM software, it provides capabilities that would typically cost several times more in commercial products.
For system administrators, IT professionals, and tech enthusiasts who need occasional remote hardware-level access to computers, the KVM-A3 provides excellent value. Its ability to function when a system is in BIOS, crashed, or even powered off makes it an invaluable tool for remote troubleshooting and maintenance.
While it lacks some of the refinements and higher performance of commercial solutions, the core functionality is solid, and the open-source nature of the PiKVM software means it continues to improve over time. The DIY aspect may be a barrier for some users, but the assembly process is well-documented and achievable for anyone with basic technical skills.
Overall, the Geekworm KVM-A3 earns a strong recommendation for those seeking an affordable entry into KVM-over-IP technology, particularly for home labs, small businesses, or remote management of personal systems. It demonstrates that effective remote management solutions don’t necessarily require enterprise-level budgets, and the open-source approach provides both cost savings and flexibility that proprietary solutions often lack.
Geekworm KVM-A3 IP KVM Review
Summary
The Geekworm KVM-A3 earns a strong recommendation for those seeking an affordable entry into KVM-over-IP technology, particularly for home labs, small businesses, or remote management of personal systems. It demonstrates that effective remote management solutions don’t necessarily require enterprise-level budgets, and the open-source approach provides both cost savings and flexibility that proprietary solutions often lack.
Overall
90%-
Overall - 90%90%
Pros
- Affordable entry point to KVM-over-IP technology
- Comprehensive feature set including video capture, keyboard/mouse emulation, and virtual storage
- ATX power control for remote power management
- Open-source software with regular updates and a supportive community
- Flexibility to customise and extend functionality
- Good documentation and assembly guides
Cons
- Limited to 1920×1080 @23Hz, compared to 60Hz on official PiKVM hardware
- Requires DIY assembly and some technical knowledge
- Single-system control without additional hardware
- Some compatibility issues with certain graphics configurations
- Cable management can be challenging
I am James, a UK-based tech enthusiast and the Editor and Owner of Mighty Gadget, which I’ve proudly run since 2007. Passionate about all things technology, my expertise spans from computers and networking to mobile, wearables, and smart home devices.
As a fitness fanatic who loves running and cycling, I also have a keen interest in fitness-related technology, and I take every opportunity to cover this niche on my blog. My diverse interests allow me to bring a unique perspective to tech blogging, merging lifestyle, fitness, and the latest tech trends.
In my academic pursuits, I earned a BSc in Information Systems Design from UCLAN, before advancing my learning with a Master’s Degree in Computing. This advanced study also included Cisco CCNA accreditation, further demonstrating my commitment to understanding and staying ahead of the technology curve.
I’m proud to share that Vuelio has consistently ranked Mighty Gadget as one of the top technology blogs in the UK. With my dedication to technology and drive to share my insights, I aim to continue providing my readers with engaging and informative content.

